As an example I'm using the classic Peggy-Lee song, "Fever" - which a student recently asked me to help them learn.
I'll take you through a process of coming together with a strumming pattern, which will hopefully help you do so on your own for any song you want to play.
Here's the original, to refer to:
Firstly, identify the main riff and count the beats to identify how long it is.
Before the vocal comes in, the riff lasts for four bars and is repeated twice.
Once the vocal comes in the first two bars are repeated three times, with an additional two-bar pattern to complete it. Let’s focus on the initial, repeated two bar pattern first.
In terms of strumming diagrams, one bar of 4/4 time generally consists of 4x downs (the beats) and x4 ups (upbeats or off-beats):
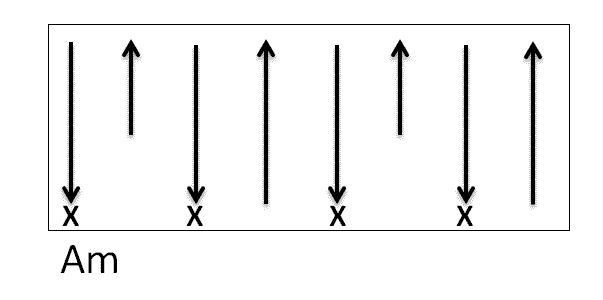
 Our strumming wants to complement or copy the riff. When I listen to the original song, two things stand out to me – the bass and the finger-snapping. Count the beats and identify which beats the finger-snaps fall on. Mark them with an ‘X’:
 We can copy the finger-snapping sound when we strum by simultaneously striking and muting the strings with our strumming hand (a form of palm-mute).
Now let’s consider the bass riff. Identify which beats the bass notes ‘land’ on:
 Now, if we combine the rhythm of the finger-snaps and the bass beats:
 In a practical sense this gives us a couple of practical techniques to master (covered within the video at the base of this tutorial).
Firstly the muting, and then a muted beat followed immediately by an (upward) off-beat, as in the second bar with the 2nd beat and the up-stroke that immediately follows it.
When practicing a new technique it’s best to keep everything else as simple as possible so that all of our attention can focus on the technique we’re developing.
Therefore I suggest that, to begin with, you try this with a simple chord that you find easy to fret. I use a simple, open Am within the below video. At first I suggest you try muting continuously.
Once that begins to come together then practice playing the chord on the 1st and 3rd beats whilst playing muted-down-strokes on the 2nd and 4th beats:

Now we’re ready to play the up-stroke immediately following the muted-down.
You may find it easier to forget about playing in time for a few moments, just whilst you get a feel for how to do this. Once it begins to sound correct, and to feel comfortable, then try muting every beat except the 2& and 4&:

When you feel ready to develop further then practice this:
 …and then introduce a chord change:
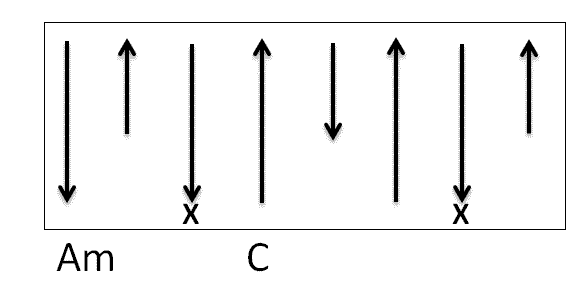
 Finally, we can pull everything together to create a strumming pattern for the first two bars we have been focussing upon:
 Once you are comfortable playing that, the final two bars will be fairly easy. Note that the final Am chord comes in on the 4&. I’m suggesting letting that ring out until the 2nd beat of the last bar.
 Here is a video that demonstrates the techniques and strumming patterns featured within this tutorial:
So there you have it! A step-by-step approach for creating a strumming pattern:
I'll take you through a process of coming together with a strumming pattern, which will hopefully help you do so on your own for any song you want to play.
Here's the original, to refer to:
Firstly, identify the main riff and count the beats to identify how long it is.
Before the vocal comes in, the riff lasts for four bars and is repeated twice.
Once the vocal comes in the first two bars are repeated three times, with an additional two-bar pattern to complete it. Let’s focus on the initial, repeated two bar pattern first.
In terms of strumming diagrams, one bar of 4/4 time generally consists of 4x downs (the beats) and x4 ups (upbeats or off-beats):
 Our strumming wants to complement or copy the riff. When I listen to the original song, two things stand out to me – the bass and the finger-snapping. Count the beats and identify which beats the finger-snaps fall on. Mark them with an ‘X’:
 We can copy the finger-snapping sound when we strum by simultaneously striking and muting the strings with our strumming hand (a form of palm-mute).
Now let’s consider the bass riff. Identify which beats the bass notes ‘land’ on:
 Now, if we combine the rhythm of the finger-snaps and the bass beats:
 In a practical sense this gives us a couple of practical techniques to master (covered within the video at the base of this tutorial).
Firstly the muting, and then a muted beat followed immediately by an (upward) off-beat, as in the second bar with the 2nd beat and the up-stroke that immediately follows it.
When practicing a new technique it’s best to keep everything else as simple as possible so that all of our attention can focus on the technique we’re developing.
Therefore I suggest that, to begin with, you try this with a simple chord that you find easy to fret. I use a simple, open Am within the below video. At first I suggest you try muting continuously.
Once that begins to come together then practice playing the chord on the 1st and 3rd beats whilst playing muted-down-strokes on the 2nd and 4th beats:

Now we’re ready to play the up-stroke immediately following the muted-down.
You may find it easier to forget about playing in time for a few moments, just whilst you get a feel for how to do this. Once it begins to sound correct, and to feel comfortable, then try muting every beat except the 2& and 4&:

When you feel ready to develop further then practice this:
 …and then introduce a chord change:
 Finally, we can pull everything together to create a strumming pattern for the first two bars we have been focussing upon:
 Once you are comfortable playing that, the final two bars will be fairly easy. Note that the final Am chord comes in on the 4&. I’m suggesting letting that ring out until the 2nd beat of the last bar.
 Here is a video that demonstrates the techniques and strumming patterns featured within this tutorial:
So there you have it! A step-by-step approach for creating a strumming pattern:
- Listen to the original and analyse it - break it down, taking a repeatable section
- Notice where the 'stressed' beats are and copy these into your strumming pattern
- Identify where the chords fall and add these to your pattern
- Embellish as you see fit, using techniques such as palm muting
